
Barcoding your library books is a crucial step in efficient catalog management. It streamlines the check-in/check-out process, helps in inventory control, and reduces manual errors. Whether you’re setting up a new library system or updating an existing one, creating barcodes doesn’t have to be complicated. In this step-by-step guide, we’ll walk you through everything you need to know to generate and use barcodes for library books.
Why Use Barcodes for Library Books?
Before diving into the process, let’s understand why barcodes are essential for library operations:
- Faster transactions: Scan and process books instantly.
- Accurate tracking: Know exactly which book is borrowed or returned.
- Inventory management: Conduct audits easily with barcode scanning.
- Reduced human error: Automate data entry and minimize mistakes.
Step 1: Choose a Barcode Type
The most common barcode formats for libraries are:
- Code 39: Alphanumeric, commonly used in libraries.
- Code 128: More compact and efficient for longer numbers.
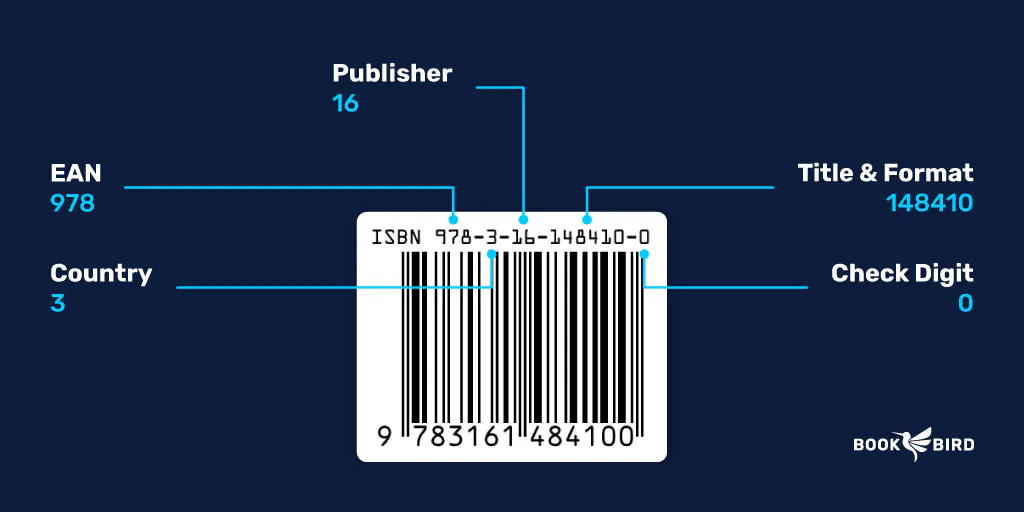
- EAN-13 or ISBN: Standard for commercial books, based on their ISBN.
For internal library rfid system, Code 39 is typically preferred due to its simplicity and wide compatibility.
Step 2: Assign Unique Book IDs
Each book in your library should have a unique identifier. You can use:
- Accession numbers
- Catalog numbers
- ISBN with a prefix or suffix
- Custom alphanumeric codes
Tip: Keep your ID system consistent to avoid duplication or confusion.
Step 3: Generate the Barcode
You can create barcodes using various tools:
Barcode Generator Software
- Online tools like Barcode Tec-It or BarcodesInc
- Library management systems (LMS) that include built-in barcode generation
- Desktop software like Adobe Illustrator (with plugins), BarTender, or NiceLabel
Barcode Font Method
You can also install a barcode font (like Free 3 of 9) and use Microsoft Word or Excel to generate barcode images.
Step 4: Print the Barcodes
Use a barcode printer or a standard laser printer with high-quality labels. Recommended formats:
- Self-adhesive label sheets (e.g., Avery labels)
- Thermal transfer labels for durability
Make sure the barcode is:
- Clearly printed
- Easily scannable
- Placed in a consistent location (usually inside the front cover or on the spine)
Step 5: Apply Barcodes to Books
Once printed, carefully apply each barcode to its corresponding book. Ensure:
- Labels are flat with no wrinkles
- Barcodes aren’t obstructed or covered
- Barcode placement matches your cataloging policy
Step 6: Update the Library Management System
Finally, update your library software or catalog with each book’s barcode ID. This allows your system to:
- Recognize scanned items
- Track borrower activity
- Maintain accurate inventory
Bonus Tips for Barcode Management
- Backup your barcode database regularly
- Use barcode scanners compatible with your format
- Protect barcodes with transparent covers if needed
- Train staff on using scanners and software correctly
Final Thoughts
Creating barcodes for library books is a small investment that pays off big in terms of time savings and operational efficiency. With the right tools and a systematic approach, you can barcode your entire library collection quickly and effectively.