
When I first started exploring mehndi designs, I honestly felt overwhelmed. You see those gorgeous, intricate patterns online and think, “There’s no way I can draw that!” But here’s the truth I wish someone told me earlier: simple mehndi designs can be just as stunning, sometimes, even more!
In this post, I’m walking you through everything I’ve learned over time—styles, step-by-step guidance, and tips that even beginners can follow easily. No fluff, no hard-to-understand jargon—just pure, pretty mehndi inspiration!
Why Simple Mehndi Designs Are Always in Style
Before we dive into the actual patterns, let’s talk about why simplicity works.
- First off, simple designs are super versatile. You can wear them at a wedding, a family dinner, or even a casual hangout.
- They’re easy to apply, especially if you’re just starting out.
- And most importantly? They bring out your natural beauty without overpowering your look.
Honestly, not everyone wants their hands covered edge to edge. Sometimes, a clean floral pattern or a leafy trail can say more than a thousand curls and swirls.
Top Types of Simple Mehndi Designs to Try Today
Let’s break down the popular styles that always look chic yet easy to create.
1. Minimalist Floral Trails
These are my absolute favorites. You start from the index finger or thumb and draw a leafy or floral vine that trails toward the wrist.
Why it works:
- It gives a classy feel
- Takes less than 10 minutes
- Doesn’t need symmetry—so, no pressure!
Pro tip: Use dots and tiny spirals to fill the gaps without making it look crowded.
2. Arabic Mehndi with Open Spaces
Arabic-style designs are bold yet simple. The magic lies in the empty spaces—it gives your design room to breathe.
Common elements include:
- Bold flowers
- Diagonal trails
- Shaded leaves and petals
This design flows diagonally and looks super stylish on both front and back hands. I always recommend Arabic style when someone wants something impactful but not too time-consuming.
3. Tikki Style Mehndi
Tikki or circular mehndi is evergreen. I’ve seen grandmothers, moms, and even kids rock this style effortlessly. It starts with a central circle (the tikki) and builds outwards with small designs.
Perfect for:
- Festive occasions
- Religious events
- Kids and beginners
Add a border, some dots, and your tikki is ready to shine.
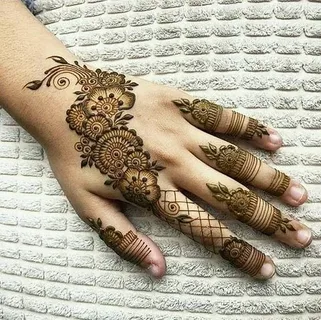
4. Finger Focused Designs
Not everyone wants full-hand mehndi. Finger-focused designs are the new favorite.
You can simply decorate the tips, add a band-like pattern at the middle joints, or do a finger-to-finger chain look. Add small geometric lines or leafy patterns, and you’re done.
Plus point? You can still type, swipe, and do all your phone scrolling with mehndi only on your fingers. 😄
5. Wrist Band Mehndi Designs
This one’s a game changer. Imagine a delicate mehndi bracelet—yes, it exists.
You just draw a floral or leafy band around the wrist like a real bracelet and maybe extend it with a string design towards the middle finger.
Why I love it:
- Gives jewelry vibes
- Minimal but elegant
- Can be paired with rings or bangles
How to Apply Simple Mehndi Designs at Home (Even If You’re a Beginner)
You might be thinking, “I’m not artistic—I can’t do this!” But trust me, if I can do it, so can you.
Step 1: Prep Your Hands
Always wash your hands before applying mehndi. This removes oil and helps the stain stick better. Some people rub a lemon and sugar mixture on the skin—that helps too.
Step 2: Use a Pre-filled Mehndi Cone
Buy a readymade cone (the good ones are soft and easy to control). Cut a tiny hole at the tip—smaller the hole, more control you’ll have.
Step 3: Start With a Pencil Sketch (Optional)
For beginners, lightly sketch your design using a white eyeliner pencil. It works like training wheels for your mehndi art.
Step 4: Keep It Simple and Steady
Start with dots, lines, and curves. Don’t rush. The more confident your strokes, the better your design looks.
Step 5: Let It Dry Naturally
Leave the mehndi for at least 3–4 hours, or overnight if possible. Don’t wash it off—scrape it off instead. Then apply mustard oil or clove steam to darken the color.
Best Occasions to Flaunt Simple Mehndi Designs
You don’t need a wedding invitation to enjoy mehndi! These styles suit almost every occasion.
- Eid or Diwali: Keep it cultural yet chic.
- Birthdays: Surprise your bestie with a floral design.
- Anniversaries: Add a romantic heart or initials in the pattern.
- Everyday glam: Mehndi is not just for special events—why not make it part of your self-care routine?
Pro Tips for Long-Lasting and Beautiful Mehndi Stain
Let me give you some quick advice that I’ve personally tested over the years:
- Avoid water for the first 6–8 hours after scraping the mehndi.
- Apply Vicks or a balm—it boosts the stain naturally.
- Avoid shaving or exfoliating your hands for 2–3 days after applying.
- Use lemon and sugar once the mehndi dries to keep it moist and help it stick longer.
You’ll thank me later!
Common Mistakes to Avoid When Applying Mehndi
No matter how beautiful the design, these mistakes can ruin your final look:
- Cutting too big a hole in the cone (your design becomes too thick)
- Not cleaning hands properly before starting
- Washing mehndi with water (please don’t—it weakens the stain!)
- Touching your face or hair while it’s still wet
- Rushing the process—good mehndi takes patience
Final Thoughts – Simplicity is the New Statement
Gone are the days when only full-hand mehndi was seen as beautiful. In today’s time, less is truly more. A small leafy vine, a soft floral ring, or a sleek finger design can express more grace and charm than hours of detailed work.
Simple mehndi designs are about expressing your style, not following rules. You can try different patterns, blend styles, or even create your own signature look.
If you’re just getting started, don’t be shy. Mehndi is not just an art—it’s a feeling. A celebration of culture, creativity, and confidence.