
Air sealing should be done before adding insulation, as it improves insulation performance by 20-30%. While both work together as a system, sealing air leaks first prevents moisture problems and ensures insulation reaches its rated R-value. Energy audits show homes typically lose 25-40% of heating and cooling through air leaks, making air sealing the critical first step in home efficiency upgrades.
Think of air sealing and insulation as partners rather than competitors—air sealing blocks unwanted airflow while insulation slows heat transfer. Together they create an effective thermal boundary, but performing them in the wrong order significantly reduces their effectiveness.
How Air Leaks Undermine Insulation
Even small gaps and cracks throughout your home create a cumulative effect that drastically reduces insulation effectiveness:
| Air Leak Issue | Impact on Insulation | Energy Loss |
|---|---|---|
| Stack Effect | Creates pressure that pulls air through insulation | 15-25% |
| Wind Washing | Bypasses insulation R-value | 10-20% |
| Convective Loops | Creates cold spots and drafts | 5-15% |
| Moisture Transfer | Damages insulation and reduces performance | Variable |
According to Department of Energy data, a typical home has enough combined air leaks to equal a 3-foot square hole in the wall. No amount of insulation can overcome this level of air movement.
Performance Comparison
The table below shows how different approaches affect energy efficiency in a typical 2,000 sq ft home:
| Approach | Average Annual Energy Savings | Installation Cost | ROI Timeframe | Comfort Improvement |
|---|---|---|---|---|
| Insulation Only | 10-15% | $1,800-$3,000 | 3-5 years | Moderate |
| Air Sealing Only | 15-25% | $1,200-$2,500 | 1-3 years | Significant |
| Air Sealing + Insulation | 25-40% | $3,000-$5,500 | 2-4 years | Substantial |
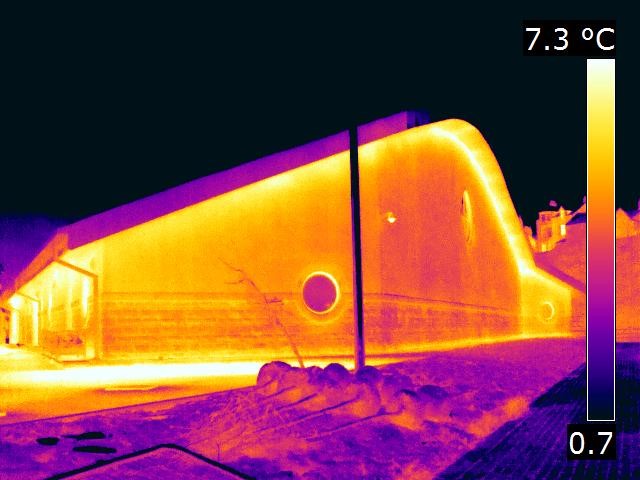
Bonus Tip: Professional energy auditors use blower door tests to measure air leakage before and after sealing. This test typically costs $300-$600, but it can identify exactly where your home is losing energy.
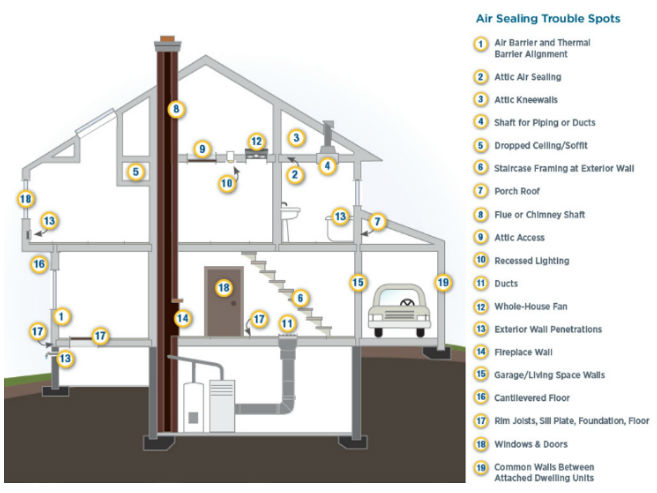
Key Air Leakage Points
Address these common air leakage areas for maximum benefit:
- Attic access hatches and doors
- Recessed lighting fixtures
- Plumbing and electrical penetrations
- Chimney and flue penetrations
- Window and door frames
- Rim joists in basements/crawlspaces
- Electrical outlets on exterior walls
- Ductwork connections
- Whole-house fans and attic fans
- Dropped soffits and kitchen cabinet tops
The Science Behind the Sequence
The physics of home energy efficiency explains why air sealing must precede insulation:
- Convection Currents: Air movement through insulation dramatically reduces its effective R-value
- Moisture Transport: Air leaks carry water vapor that can condense within insulation
- Pressure Differences: The Stack effect creates constant air movement from lower to upper levels
- Thermal Bridging: Air leaks create pathways around insulation
Industry research indicates that properly air-sealed homes with moderate insulation often outperform poorly sealed homes with extensive insulation.
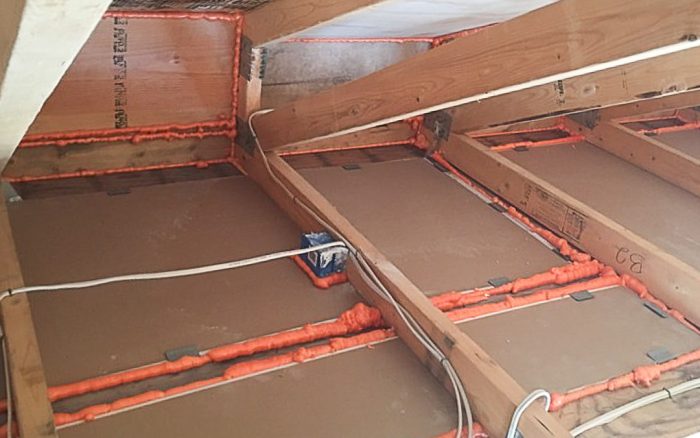
Material Comparison for Air Sealing
Choose the right air sealing materials for different applications:
| Material | Best Applications | Durability | Cost Range | DIY Friendly |
|---|---|---|---|---|
| Caulk | Small gaps (¼” or less) | 5-10 years | $3-8 per tube | Yes |
| Expanding Foam | Medium gaps (¼” to 3″) | 20+ years | $5-12 per can | Yes |
| Weatherstripping | Doors and windows | 2-10 years | $5-30 per unit | Yes |
| Rigid Foam Board | Large openings | 20+ years | $15-30 per sheet | Moderate |
| Spray Foam (pro) | Comprehensive sealing | 30+ years | $1.50-$3.50 per sq.ft. | No |
| Metal Flashing | High-temp areas | 30+ years | $10-20 per roll | Moderate |
Impact on Home Health and Comfort
Beyond energy savings, proper air sealing and insulation sequencing affect:
- Indoor Air Quality: Controlled ventilation replaces random air leaks
- Moisture Control: Prevents condensation within walls and attics
- Temperature Stability: Reduces hot/cold spots throughout the home
- Noise Reduction: Decreases outside noise infiltration
- Pest Prevention: Blocks entry points for insects and rodents
Market analysis shows that properly air-sealed and insulated homes sell for 3-5% more than comparable unsealed homes, with buyers increasingly valuing comfort and efficiency.
Things to Consider Before Making a Decision
Before starting your project, evaluate these factors:
- Home Age: Older homes typically have more significant air leakage issues
- Climate Zone: Humid climates benefit even more from proper air sealing
- Existing Ventilation: Consider mechanical ventilation needs after sealing
- Budget Constraints: If limited, focus on air sealing high-impact areas first
- DIY Capability: Air sealing is often more DIY-friendly than insulation installation
Bonus Tip: If you can only afford one upgrade at a time, invest in air sealing first, then add insulation later as budget allows. This sequence maximizes your return on investment.
Professional vs DIY Approach
| Aspect | DIY Air Sealing | Professional Air Sealing |
|---|---|---|
| Cost | $200-$500 (materials) | $1,200-$2,500 (whole house) |
| Equipment Needed | Basic tools | Blower door, infrared camera |
| Time Investment | 2-4 weekends | 1-2 days |
| Effectiveness | Addresses visible leaks | Finds hidden leakage paths |
| Testing Capability | Limited visual inspection | Quantifiable results |
| Hard-to-Reach Areas | Limited access | Comprehensive access |
Topic FAQ
Can I insulate without air sealing first?
You can, but you’ll only achieve 70-80% of the potential performance from your insulation. Airflow through and around insulation dramatically reduces its effective R-value. Think of it like wearing a sweater (insulation) on a windy day without a windbreaker (air sealing)—the wind cuts right through.
How do I know if my home needs air sealing?
Common signs include drafty rooms, uneven temperatures between rooms, excessive dust, high energy bills, and ice dams on roofs in winter. For a definitive assessment, schedule a professional energy audit with a blower door test to measure your home’s actual air leakage rate.
Will air sealing make my house too airtight?
Modern building science emphasizes “build tight, ventilate right.” After proper air sealing, controlled mechanical ventilation ensures fresh air exchange. This approach provides better air quality than random leaks, which can draw in pollutants from crawlspaces, garages, and wall cavities.
Which air leaks should I prioritize if I can’t do everything?
Focus first on the attic, particularly around penetrations (lights, plumbing vents, electrical), attic access points, and top plates of walls. The stack effect makes upper leaks particularly significant. Next, address basement rim joists and obvious drafts around windows and doors.
How much energy savings can I expect from air sealing alone?
Most homes see 15-25% energy savings from comprehensive air sealing, with some older homes achieving 30% or more. These savings occur immediately after the work is completed and continue year after year.
Make the Right Decision
While insulation and air sealing work together as a system, air sealing provides the critical foundation that allows insulation to perform as designed. Always address air leakage issues before adding new insulation, and if updating an existing home, consider removing and replacing insulation that bypasses are discovered. Remember that the most cost-effective approach combines both strategies—first creating an effective air barrier and then installing proper insulation levels for your climate zone. This sequence delivers maximum comfort, efficiency, and home protection.
Reviewer:
Ava Clark shared her input based on 6 years of working with spray foam insulation teams. Her focus on customer trust and communication helped shape key parts of this post.