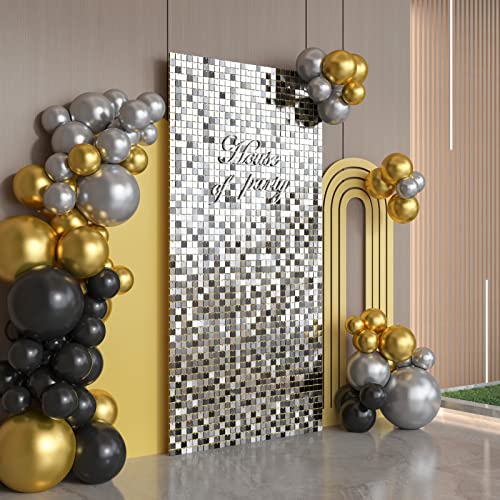
Shimmer walls are a dazzling way to elevate the aesthetics of any event, party, or even a permanent decor setting. They catch the light beautifully, add a touch of glamour, and instantly become the centerpiece of any space. Creating movable shimmer wall sections is a brilliant idea if you’re looking for a versatile, portable solution to incorporate this decor trend into various events. In this guide, we’ll walk you through the process of creating these captivating shimmer wall sections.
Why Movable Shimmer Walls?
Movable shimmer walls offer flexibility and convenience that stationary walls simply can’t match. Here are some key benefits:
- Portability: You can easily transport them to different locations, making them ideal for event planners and party hosts.
- Reusability: Use them for multiple occasions by changing their configuration or placement.
- Customizability: Movable sections can be arranged in various ways to fit the theme and space of any event.
- Cost-Effectiveness: Instead of investing in new backdrops for every occasion, you can reuse and repurpose shimmer wall panels.
Materials Needed
Before we dive into the steps, gather the following materials to ensure a smooth process:
- Shimmer wall panels — Choose high-quality panels like those available at House of Party.
- Lightweight backing material — Foam board, PVC, or thin plywood works well.
- Connectors — Velcro, hinges, or zip ties for assembling and disassembling sections.
- Tools — A ruler, scissors, a drill, and screws (depending on your choice of backing).
- Support stands — Adjustable stands or a freestanding frame for stability.
- Decorative accessories — LED lights, floral garlands, or ribbons for added flair.
Step-by-Step Guide to Creating Movable Shimmer Wall Sections
Step 1: Plan Your Design
Start by determining the size and layout of your shimmer wall. Consider:
- Event Space: Measure the area where the wall will be placed to ensure it fits perfectly.
- Panel Arrangement: Decide whether you want a single seamless wall or smaller, modular sections that can be arranged in different configurations.
- Theme and Color Scheme: Choose shimmer wall panels in colors that complement the theme of your event. House of Party offers a variety of options to match your aesthetic needs.
Step 2: Prepare the Backing Material
To create a sturdy yet lightweight base for your shimmer wall sections:
- Cut the backing material to the desired size using a ruler and scissors or a saw.
- Smooth the edges for a professional finish.
- Drill small holes if you plan to use screws to attach the panels.
Step 3: Attach Shimmer Wall Panels
Secure the shimmer wall panels to the backing material:
- Alignment: Lay out the shimmer wall panels on the backing to ensure proper alignment.
- Attachment: Use adhesive strips, screws, or zip ties to secure the panels in place. Make sure they are tightly fastened to prevent any gaps or sagging.
- Overlap Panels: If you’re using multiple panels, slightly overlap the edges for a seamless look.
Step 4: Add Connectors
To make the sections movable and modular, attach connectors:
- Velcro Strips: Apply Velcro strips along the edges for easy assembly and disassembly.
- Hinges: Attach hinges to create foldable sections.
- Zip Ties: Use zip ties for a quick and temporary connection.
Step 5: Set Up Support Stands
Movable shimmer walls need sturdy support to remain stable:
- Freestanding Frames: Use lightweight yet robust frames to hold the wall sections.
- Adjustable Stands: Opt for tripod or T-shaped stands for maximum flexibility.
- Base Weights: Add sandbags or other weights to the base for added stability, especially if the wall will be used outdoors.
Step 6: Add Finishing Touches
Enhance your shimmer wall with decorative elements:
- LED String Lights: Weave lights through the panels for a magical glow.
- Floral Garlands: Drape flowers for a romantic touch.
- Event-Specific Decor: Add themed accessories like balloons or signage.
Tips for Success
- Test Stability: Before the event, test the wall’s stability and make any necessary adjustments.
- Keep It Lightweight: Avoid using heavy materials that make the wall difficult to move.
- Protect Panels: Store shimmer wall panels in protective coverings when not in use to maintain their sparkle.
- Use High-Quality Panels: Invest in durable shimmer wall backdrops like those from House of Party to ensure longevity and visual appeal.
Creative Ideas for Using Movable Shimmer Walls
- Photo Booth Backdrops: Create a striking background for memorable photos.
- Stage Decor: Use them to frame a stage or podium.
- Wedding Aisle: Line the aisle with smaller shimmer wall sections for a glamorous entrance.
- Corporate Events: Showcase your brand logo against the shimmer wall for a professional yet eye-catching display.
Conclusion
Movable shimmer wall sections are a versatile and stunning addition to any event. By following this guide, you can create custom shimmer walls that are not only visually impressive but also practical and reusable. Don’t forget to explore the extensive range of shimmer wall backdrops available at House of Party to bring your vision to life.
Start crafting your own movable shimmer wall sections today and let your events shimmer and shine like never before!


